ERC 21x
The ERC 21x supports some types of sensors (NTC 5 K, NTC 10 K, PTC and PT1000) Check if the correct type of sensor is defined in the parameter cFg ➝ o06
Check also the if there is any offset configured for the display, in the parameter r04
Waiting for compressor delay timer, defrost in progress, line voltage to compressor too low or too high.
- Check CoP->CSt
- Check CoP ->Pot /Pod
- Check dEF ->dit, dot
- Check CoP->uLi, uLo, uHi
The pull-down is a procedure to improve cooling performance, accelerating the time used to reach the desired temperature. Pull down settings overrule all other settings, therefore there is no defrost in this meantime. The defrost might be delayed during pull down. For the ERC 11x, check parameter Pud->Pdi, for the ERC 21x check the parameter r96.
ERC 11x
The Eco mode is used for saving energy. When Eco mode is enabled, the temperature setpoint is raised and the light is switched off. Eco mode can be enabled by pressing the button on the front of the controller or automatically. For automatic Eco mode, you must mount a light or motion sensor or a door sensor. If the light sensor is used, the Eco mode will be enabled or disabled according to the ambient light level (e.g. shop lights). The motion and door sensor can also be used to enable or disable the Eco mode. When there is no movement for some time (sensor or door), Eco mode is enabled. Movement will disable the function again.
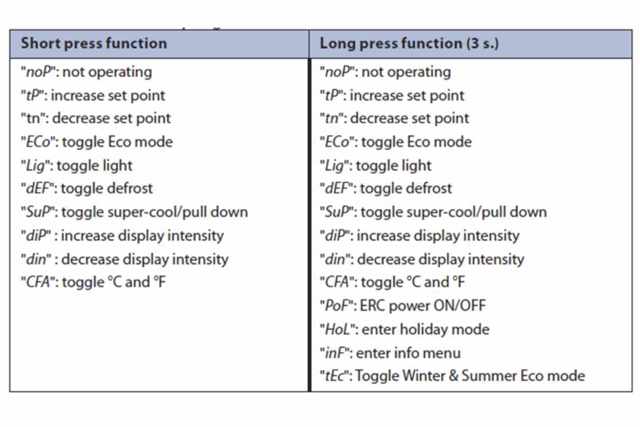
The ERC 11x has 4 buttons with predefined functions for each button, as follows:
- B1 short press: noP (not operating)
- B1 long press: PoF (power ON/ OFF)
- B2 short press: dEF (toggle defrost)
- B2 long press: inF (enter info menu)
- B3 short press: tP (increase setpoint)
- B3 long press: ECo (toggle Eco mode)
- B4 short press: tn (decrease setpoint)
- B4 long press: Lig (toggle light)
The parameters to change the function of each button are described below. “C” means 2 short presses and “L” means long press:
- b1C, b1L for button 1
- b2C, b2L for button 2
- b3C, b3L for button 3
- b4C, b4L for button 4
The buttons can be changed according to the features in the table below:
The controller will display “non” if the temperature sensor to display is not configured under SxC and SxA. For example, if the temperature to display (trS) is selected as “SCO” and if SCO is not configured to any of the inputs (S1, S2,..S4), the controller will display “non”. Also if SCO is configured, but the input configuration (SxC) is not selected correctly for that input, the same error message will be displayed. You need to ensure that the selected display sensor is correctly configured under input configuration and input application in the assignment menu group.
The Danfoss light sensors (PN 080G3311, 080G3313 or 080G3315) are used in the ERC11x series to measure the level of ambient light around the cabinet so that night and day "Economy", and "Normal" modes of operation can automatically be set, as well as the brightness of the display.
It is recommended to place the sensor in a way that the interior light does not affect the sensor. A possible placement could be in the front of the cooler or at the top.
To configure the light sensor in the ERC follow these steps:
- Press "^" and "v" together and hold 5 seconds to access the menu.
- Type the password (if required)
- Go to the menu ASi
- Go to the corresponding sensor configuration parameter (from S1C to S4C) and define it as “Ldr” for a light sensor
You can check in the parameter Ser à LLu the light level, in Lumens.
The light sensor is used to increase/ decrease the brightness of the display. It can also be used to set the controller to Eco mode.
To configure when the ERC will activate the Eco mode, set the parameters SLd and SLn inside the ECS menu:
- SLd: is the amount of ambient light which will cause the device to move to normal/serving mode from ECO mode (normally occurs in the morning).
- SLn: is the amount of ambient light which will cause the device to move to ECO mode from normal/serving mode (normally occurs in the evening).
The Unp message means that the ERC does not have any valid application on it. It is enough to load any application by using the KoolKey, Gateway or Copy Key.
Waiting for compressor delay timer-defrost in progress. The line voltage to the compressor is too low or too high.
- Check CoP->CSt
- Check CoP ->Pot /Pod
- Check dEF ->dit, dot
- Check CoP->uLi, uLo, uHi
The pull-down is a procedure to improve cooling performance, accelerating the time used to reach the desired temperature. Pull-down settings overrule all other settings, therefore there is no defrost in this meantime. The defrost might be delayed during the pull-down. For the ERC 11x: check parameter Pud->Pdi. For the ERC 21x: check the parameter r96.
EETx
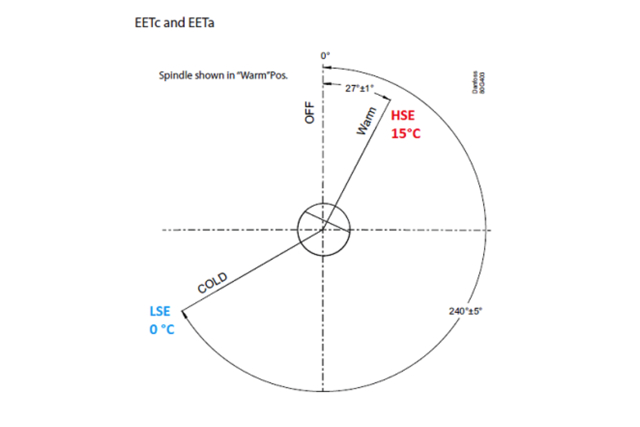
The spindle defines the cut-in and cut-out temperature of the thermostat, depending on the position. It has an area of 240, where the last 27 are used to turn OFF the thermostat if necessary. The parameters LSE and HSE will define the reference temperature, according to the position of the spindle.
In the example below, we have LSE = 0°C and HSE = 15°C. If the spindle is in the middle, the reference temperature will be 7,5°C.
AK-RC 204B, 205C, 305W
Yes, they can, for systems that are not using the electronic expansion valve.
No, the MCB is an actual magnetic thermal protection from excessive current flows, but it does not consider leakage current. There is no need for leakage protection in cold rooms due to the installation facility that already includes earth in the main panel.
The defrost for two evaporators is managed with two different sensors.
Please note that the product is provided with two sensors (room temperature and one evaporator) – the third sensor is not included.
Miscellaneous
For the supported devices (ETC 1H, ERC 111/112/113, ERC 211/213/214, EKE 1A/B/C, AK-CC55), it is possible to create offline databases, change parameters online on the connected controller, upgrade firmware of the controller (check the availability of the part number in the KoolProg®), simulate online and create trends/ graphs in real time for simulating operation and specific conditions.
Condenser sensor
The condenser sensor is used to protect the compressor against high pressure when the condenser is blocked or the condenser fan fails.
Place the sensor at the liquid side of the condenser.
Use a metal bracket or metal tape to ensure good thermal conductivity. Be sure that the cable does not pass hot spots at the compressor or condenser that exceeds 80°C.
Ambient light sensor
The ambient light sensor is used to detect opening hours of a shop. The sensor must be placed so that the interior light of the cabinet (cooler) does not affect the sensor.
Possible placement could be in the front of the cooler or at the top.
Door sensor
The door sensor is used to detect buying activity and to stop the fan when the door is opened.
Danfoss does not supply the door switch. Use the door switch you have and connect it to the cable supplied by Danfoss.
What ERC models can be used with these special sensors?
The ERC 11x supports all these features, with analog ambient light sensor input. This makes the reading in Lumens possible. The ERC11x also has a digital output intended for light.
The ERC 21x does not support the reading of the light level via sensor, however it has a digital output to manage lights.
KoolKey
KoolKey is an interface and programming device to:
Connect the Danfoss electronic controller to a PC and act as a gateway when working online using the KoolProg® application on the PC.
Act as programming key to program settings into the Danfoss electronic controllers in the production and field.
MPK
The MPK is a simple programming key to be used for mass programming of a controller in the production assembly line.
Docking station
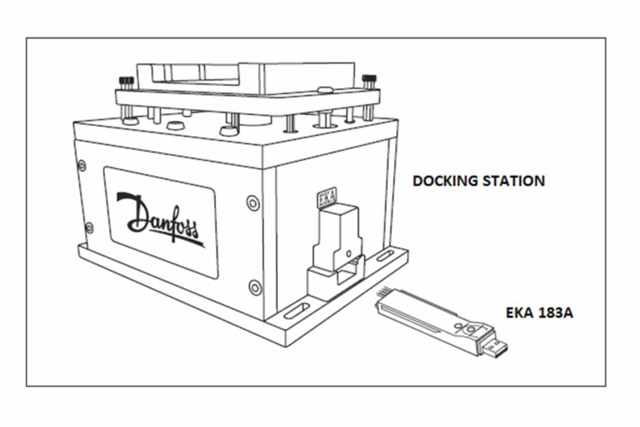
The docking station is a platform which can be used to program the ERCs in a very quick and easy way. In combination with the EKA 183A, it can program an ERC in a few seconds. The process is: create a database via KoolProg®, save this database to the EKA 183A and connect it to the docking station. Then the ERC can be programmed easily. See the picture below:
In this video there is an overview of how to connect your ERC/EET to the Smartphone using the Bluetooth Enabler.

In this video, our product expert will show us how to program ERC/EET controllers using Koolkey.

